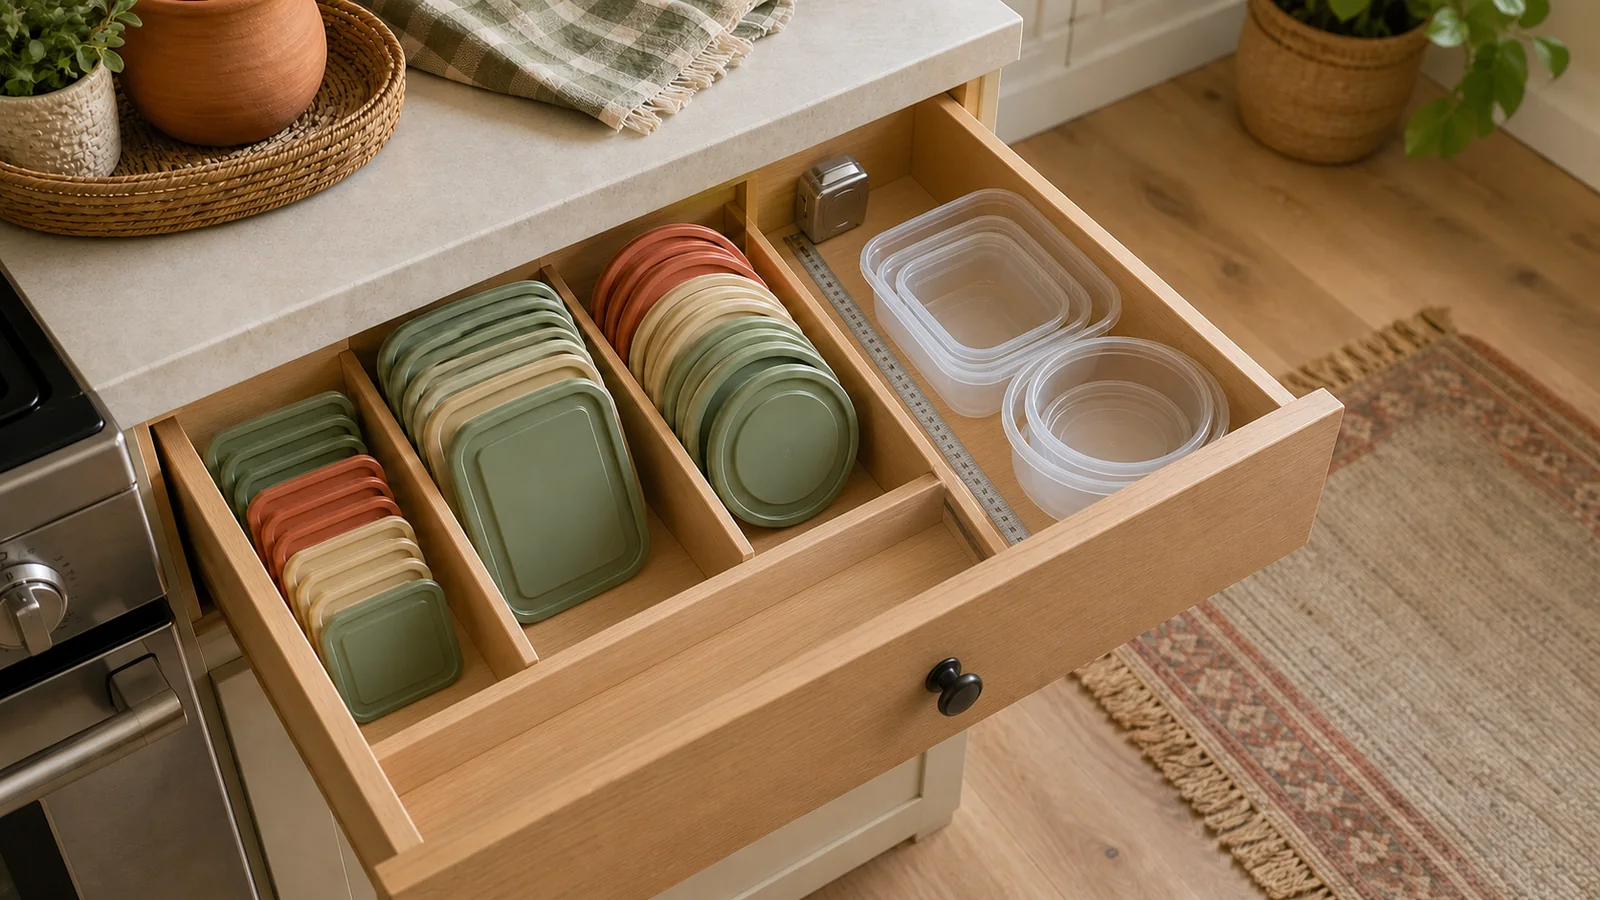
Food container lids are hard to organize when the collection contains too many shapes, orphaned pieces, and organizers chosen before anyone measured the cabinet. The quickest fix is to match every usable lid to a container, measure the space, and store lids upright in a few broad size zones.
Do that before buying another divider. You may already have enough room once the unmatched pieces are gone.
Quick answer
- Empty the whole container area.
- Match every lid to a container. Set unmatched and damaged pieces aside.
- Group the remaining lids by shape and size, not color.
- Measure the usable width, depth, and height of the drawer or cabinet.
- Test upright storage with a box or bin you already own.
- Choose a divider, vertical file, or open bin only if its full dimensions fit the measured space.
- Give new containers a one-in, one-out rule so the lid collection does not spread again.
The goal is not a perfect row of identical plastic. It is being able to take one container and find its lid without unloading the cabinet.
Start with a full matching round
Pull out the containers and lids together. Working on the lids alone preserves the main problem: you cannot tell which pieces still belong to a usable set.
Set one container on the counter and find the lid that closes it correctly. Do not count a lid as a match because it rests on the rim. It should attach in the way its maker intended, without being forced or leaving an obvious gap.
Make four groups:
- matched containers and lids you use;
- matched sets that rarely leave the cabinet;
- lids with no container and containers with no lid;
- pieces that are cracked, warped, chipped, or missing part of a closure.
Check the manufacturer’s current care or replacement guidance before deciding whether a questionable piece should stay in food use. Different materials and closure systems have different limits. This guide cannot tell from appearance alone whether a stained or misshapen lid is still suitable.
Give the orphan group a short deadline. If a missing mate is likely to be in the dishwasher, freezer, or lunch bag, keep the piece in a small holding box for a week. If no mate appears, move it out of the active kitchen zone. An indefinite orphan pile is how the cabinet fills back up.
Measure the space you actually have
Measure the inside of the empty storage area, not the cabinet face or drawer front.
Record:
- usable width between walls, hinges, runners, or other obstructions;
- usable depth from the inside front edge to the back wall;
- usable height below the shelf above or the closed drawer opening;
- the narrowest opening the organizer must pass through;
- any lost space caused by a hinge, pipe, shelf pin, or drawer curve.
For a drawer, close it gently with the tallest lid standing where you plan to store it. Stop if the lid catches the frame or the drawer above. For a cabinet, check whether the door hinge cuts into the front corner and whether you can lift a lid out without removing the shelf above.
Write the numbers down. A product photo that says “for cabinets” does not prove it fits your cabinet.
Even adjustable organizers have fixed measurements in the other directions. IKEA, for example, lists its VARIERA organizer at 5 3/4 inches wide and 4 inches high, with an adjustable length. The useful lesson is not that you need that product. It is that “adjustable” never means adjustable in every direction. See the manufacturer’s listed dimensions.
Sort lids by geometry, not by appearance
Color is easy to see, but it rarely helps you find a fit. Shape and edge profile do.
Start with broad families:
- small rectangles and squares;
- large rectangles and squares;
- round lids;
- unusual snap, vented, gasketed, or divided-container lids.
Then look at thickness. A thin flexible lid may fit in a narrow divider slot. A lid with tall locking tabs needs more room and may snag when packed tightly. A round lid can roll or rotate in a wide file unless the sides hold it loosely in place.
Keep specialty lids with their exact container when the closure is hard to distinguish. One odd lunch container does not need its own organizer zone. Store it assembled if that uses less time and does not trap moisture.
Avoid forcing lids into a row so tight that you have to bend them to remove one. The storage system should hold lids upright without turning each retrieval into a wrestling match.
Choose the method by location
In a shallow drawer
Use low dividers to create two or three broad lanes. Put the lids upright with their long edge down when that position clears the closed drawer. Keep the largest lids toward the back or side so they do not hide the smaller group.
A drawer works well when you can see every family from above. It works poorly when the lid height is close to the opening or when the drawer is needed for heavy glass containers.
Before buying an insert, make a temporary lane with a clean narrow box or a piece of corrugated cardboard folded into a U shape. Open and close the drawer several times. If lids tip into the runner or catch the frame, change the plan.
On a cabinet shelf
A vertical file or divided open bin can keep lids from spreading across the shelf. Choose a shallow enough setup that you can reach the back without removing the whole stack.
Do not use every inch of depth just because it exists. A very deep organizer can recreate the same hiding problem inside a nicer-looking box. Leave enough room to grip and remove the bin if the shelf sits below eye level.
If the containers are glass, consider keeping the heavy bases on a lower shelf and the lighter lids in a nearby file. Nest glass only when the manufacturer permits it and the stack is stable. Do not build a tall stack that has to be lifted over your face.
In a deep pantry
Treat lids as one retrieval zone, not as loose pieces tucked around food. Use a front-accessible bin or file and label the zone by job, such as “everyday containers,” rather than trying to list every size.
If the shelf is deep enough for lids to disappear behind other items, the larger problem is shelf retrieval. Our deep-pantry organization guide explains how to set front, middle, and back zones without turning the shelf into a wall of bins.
Pick an organizer only after a dry fit
You do not need a dedicated lid organizer if a stable open bin, file, or divider you already own passes the test.
A workable setup should:
- fit the measured space with the door or drawer fully closed;
- keep each lid family visible;
- let one lid come out without pulling the whole row;
- stay stable when the row is half empty;
- leave locking tabs and gasket edges free from pressure;
- be easy to remove and wipe clean.
Test the footprint with painter’s tape or a cardboard rectangle cut to the product’s listed width and depth. Then add the real height using a box or folded card. This catches the common mistake of checking the shelf footprint but forgetting the lid or divider height.
Do not count an organizer’s advertised capacity as your capacity. Thick locking lids take more space than thin flat lids. Your largest lid, not the marketing photo, sets the useful slot width.
Decide where the containers go
The bases need a plan too. Nest containers only when they sit securely and come apart without a struggle. Keep unusually deep, heavy, or frequently used containers where you can lift them without disturbing a tall stack.
Store matched specialty sets assembled if finding the correct lid costs more space and time than nesting saves. Everyday sets can stay nested with lids filed beside them.
If you use containers for refrigerated leftovers, keep them clean, dry, and ready to cover food. The FDA advises storing refrigerated foods in covered containers or sealed bags and keeping the refrigerator at or below 40°F. See the FDA’s food-storage safety guidance. For produce specifically, our guide to storing washed vegetables without trapping extra moisture separates whole, cut, and cooked vegetables by preparation state.
Use a reset rule that fits real life
The first week tells you whether the system works.
When a clean lid returns from the dishwasher, it should have one obvious home. If someone has to compare six nearly identical slots, simplify the zones. If the most-used lids always land on the counter, move that group closer to the front.
Once a month, take ten seconds to look for:
- an orphan that never found its mate;
- a new container with no assigned zone;
- a lid wedged behind the bin;
- a divider that has shifted;
- a stack that has become too heavy or tall.
Use a one-in, one-out rule when adding a new container set unless the new piece fills a job the current collection cannot do. The rule is not about owning a particular number. It keeps the storage zone tied to its measured limit.
Common mistakes
Buying for the number of lids
Twenty thin lids and twenty thick locking lids need different amounts of space. Measure the widest edge profile and the full group thickness instead.
Storing every lid flat
A flat stack hides the bottom lids and makes the whole pile move when you need one. Upright storage usually improves visibility, provided the drawer or shelf has enough height.
Making too many tiny categories
A separate slot for every exact size looks orderly when full and becomes awkward when one container is in use. Broad shape-and-size zones leave the system room to breathe.
Keeping unmatched pieces in the active zone
An orphan may be worth holding briefly, but it should not compete with complete sets forever. Give it a dated holding box outside the everyday row.
Treating “adjustable” as universal fit
An organizer may expand in length while its width, height, and divider spacing remain fixed. Check all dimensions and the closed-door path.
Frequently asked questions
Should lids stay on the containers?
It depends on the collection. Keeping specialty sets assembled makes sense when the lid is hard to identify or the bases do not nest well. Filing everyday lids separately usually saves space. Make sure washed pieces are fully dry before closing them together.
Is a drawer better than a cabinet?
A drawer gives a clear top view, but only if the lids clear the opening. A cabinet handles taller lids and removable bins, but deep shelves can hide the back row. Choose the location that gives you the better retrieval path, not the prettier photo.
What should I do with lids that no longer fit?
First check for the mate in normal out-of-zone places. Then consult the container maker for replacement availability, care limits, and local disposal guidance. Do not force a near fit or assume two similar lids are interchangeable.
Do I need to replace all my containers with one system?
No. A short matching round and two or three broad zones can make a mixed collection workable. Replace a set only for a real condition or use problem, not because the colors differ.
Sources and research note
This is a method-first, noncommercial guide. Well Walked Finds did not physically test a lid organizer or the reader’s containers. We checked live search wording, manufacturer dimensions, current site coverage, and government food-storage guidance on August 7, 2026.